
If you are looking for a quick solution for how to straighten a photo in Lightroom you come to the right place. This article will teach you how to use my tried and tested 3 step approach to straightening any photo.
It’s rare when we take a photograph and the geometry of the shot doesn’t require any corrections or tweaking. In fact, it is almost a certainty that, with most photos, we will have to correct various types of distortions and imperfections.

The good is thing is that Lightroom gives us more than enough tools to deal with these issues.
To straighten a photo in Lightroom, use the following 3 step approach:
in the Develop module of Lightroom, select the photo you want to straighten.
- Step 1 – Fix lens distortion by locating the Lens Correction panel and check the Enable Profile Correction option.
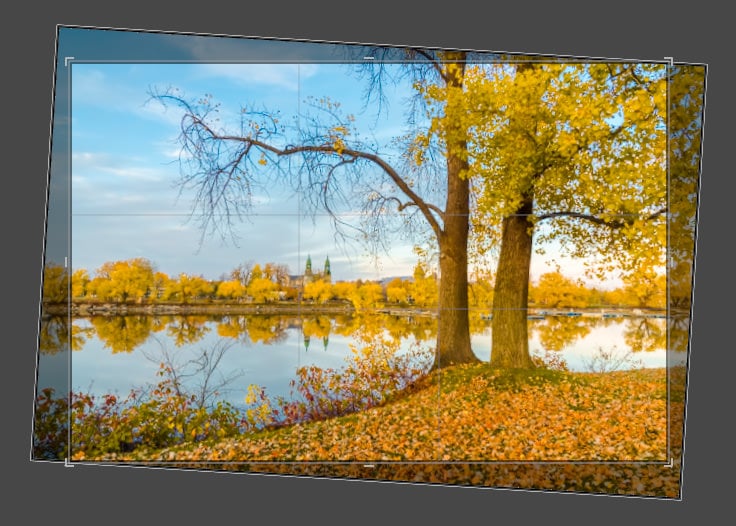
- Step 2 – Fix uneven horizon by opening the Crop Overlay tool on the right side, and click the AUTO button. Lightroom will straighten the horizon automatically.
- Step 3 – Use the Upright tools in the Transform panel to fix horizontal and vertical perspective distortions.
And now, I want to address, in more detail, three main types of geometric imperfections that we face most often in our photographs and how I approach them in my editing workflow.
1. Lens Distortion (Barrel Distortion)
The main characteristic of lens distortion is when the straight lines in the real world appear to be bent or curved in the captured photograph. Lens distortion is a direct result of the lens design and, as a result, varies from lens to lens.
There are two common types of lens distortion: Barrel Distortion and Pinch Distortion.

Barrel Distortion is when straight lines are bent outward from the center.

Pinch Distortion is when straight lines are bent inward toward the center.
Pinch Distortion is produced by telephoto lenses and Barrel Distortion is produced by wide-angle lenses.
Wide-angle lenses tend to produce a much stronger lens distortion and, as a result, barrel distortion is the most common type of distortion we face when shooting landscape and architectural photographs.
Related: How to Merge Multiple Catalogs in Lightroom
The good news is that fixing barrel distortion is a straightforward, one-step process.
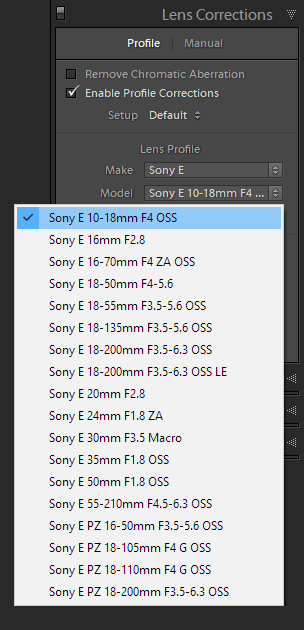
How to Fix Lens Distortion
In the Develop Module of Lightroom, open the Lens Correction Panel and check the “Enable Profile Correction” box. The program automatically fixes the distortion.

In most cases, Lightroom detects the right model of the lens and automatically applies the appropriate correction based on the lens profile. But, in some cases, it might detect the wrong lens model, which means you will need to manually select the make and model of your lens from the drop down menu.
I recently started shooting with the Fujifilm XT2 and noticed that it behaves differently in regard to Lens Correction. Fujifilm embeds the camera’s lens profile inside the RAW files and Lightroom automatically applies the correction during import.

On rare occasions when you are using an older lens or a model from a lesser-known Asian manufacturer, Lightroom may not have a lens profile in its database and might be unable to automatically correct the distortion. In these instances, you need to jump to the Manual tab and manually fix the distortion by dragging the distortion slider.

Tip: When you shoot certain landscapes and portraits, you may not see enough straight lines in the composition to serve as a reference for lens distortion. As a result, the distortions become less evident and less noticeable. In these cases, it is completely optional to fix them.
2. Uneven (Crooked) Horizon
An uneven horizon is landscape photography’s biggest enemy.
The horizon is one of the strongest points of reference that’s imprinted in our brains from an early age. When we see a photograph with a slightly uneven horizon (one to two degrees), our brains revolt and refuse to accept the uneven reality.
Related: My Top 15 Lightroom Workflow Tips
I always pay attention to the horizon during the capture and try to make it as straight as possible. But, in 90% of cases, the horizon in my photographs are slightly off and require a few tweaks in post-processing.
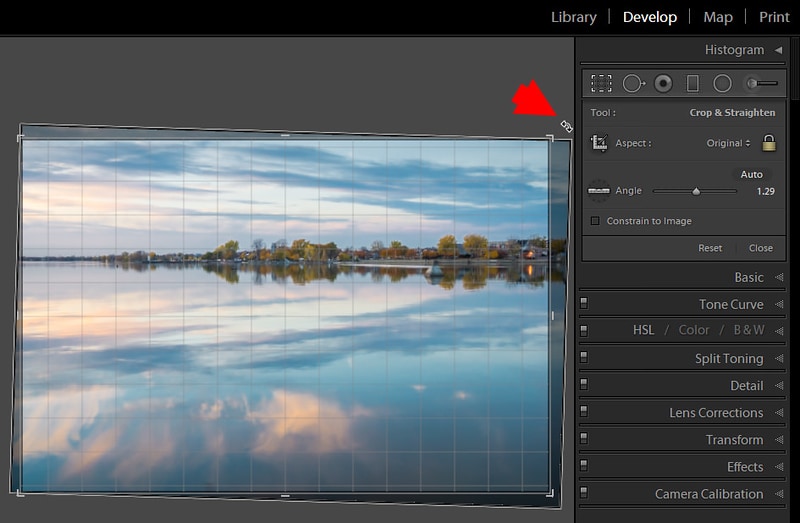
To fix an uneven horizon, open the Crop Overlay panel in the Develop Module of Lightroom. Here, you have a couple of options.

Fixing Uneven Horizon With Auto Mode
I am not a big fan of “magic buttons” that promise to fix everything automatically using AI, machine learning, and magic. But, Auto Mode in the Crop Overlay panel is a rare exception.

When you have an unobstructed horizon like those in seascapes, the Auto Mode button does a pretty good job. It only takes one click to straighten the horizon before you are ready to move on.

I used the AUTO option to fix the uneven horizon.
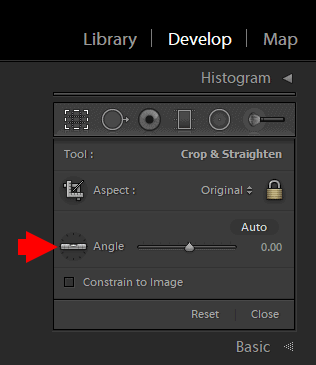
How to Manually Rotate Photo in Lightroom
For manual photo rotation, move the mouse outside the crop boundary until the Rotate Icon appears. Click the icon and drag the mouse to initiate the rotation.
When you press the mouse down, the grid inside the crop boundary appears. Try to align the grid with the horizon in the picture.
When you are happy with the result, hit the enter button to confirm the changes.
Adjusting the Horizon With the Straighten Tool
This is my favorite tool to fix crooked or uneven horizons.
Click the Ruler Icon to initiate the Straighten Tool.
Next, click and drag the mouse over the horizon in your photo.
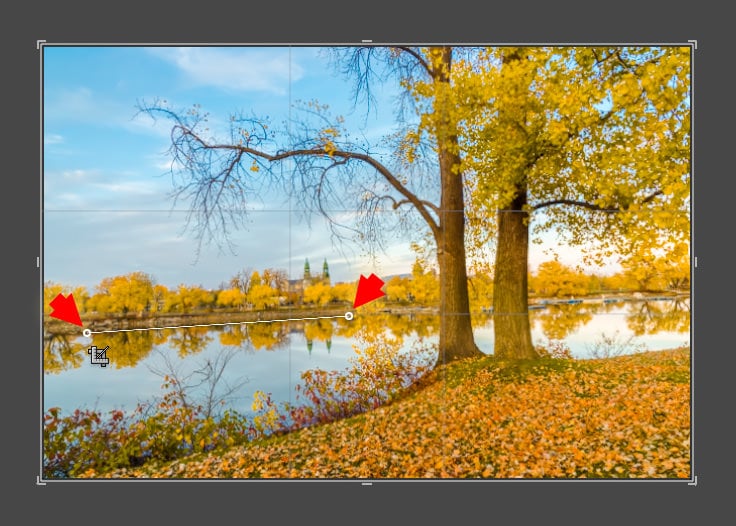
By doing this, you are indicating to Lightroom where the horizon is. Lightroom does the rest of the work by straightening the photograph.
I find this method to be the most accurate.
Tip: We all know that rules are meant to be broken, and the straight horizon rule is not an exception. So, if you intentionally want to make the horizon crooked for artistic purposes, for example, make sure that it is evident that it was done intentionally.

3. Perspective Distortion
Perspective Distortion occurs when the plane of the camera sensor is not parallel to the object we photographed. Depending on the camera position relative to the subject, the photograph can appear tilted or skewed.
Perspective Distortion is the most obvious in architectural photographs where compositions have an abundance of vertical lines.
Related: Fuji xt3 vs xt30 Comparison
When we photograph buildings from the street level, the only way to capture the entire structure is to tilt the camera upward. This results in an effect known as “converging verticals” where perfectly parallel lines in real-life appear to converge in the photograph. This effect is also known as “leaning buildings” when the buildings appear to lean or fall backward.
-

“leaning buildings” effect -

Fixed perspective
Adobe recognizes that perspective distortion is a common issue in all types of photography and has built an extensive toolset in Lightroom under the Transform Panel to address the issue.
Fixing Perspective Distortion With the Upright Tools
The Upright tool has five options: Auto, Guided, Level, Vertical, and Full.
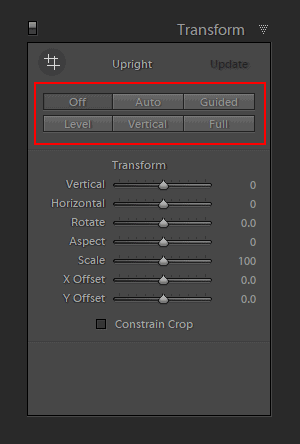
The automatic options (Auto, Level, Vertical, and Full) are how Lightroom tries to fix the different aspects of perspective distortion on its own. I find that all four automatic options are too unpredictable with their hit-and-miss results making them useless in my workflow.
The Guided option is the one I love and most often use.
With the Guided tool, you have the option to draw up to four guides to indicate which lines in the photo need to be parallel.
For example, if I want to fix the vertical perspective, I draw only two vertical lines.


But, if I need to fix both the vertical and horizontal perspectives, I draw four lines—two vertical and two horizontal—and let Lightroom do the rest.

I drew four lines in total – two vertical and two horizontal – and let Lightroom to fix the perspective.

Tip: You do not always have to fix the vertical perspective. You can do the opposite by emphasizing and using it as the element of your composition.
Example #1: I shot from the ground of the forest and deliberately tilted the camera up. The converging lines of the trees produced the effect of being deeply submerged into the forest. I had no intention of fixing these converging verticals.

Example #2: I was in downtown New York and I intentionally shot almost straight up to exaggerate the effect of the converging lines to highlight the feel of downtown and its enormous scale.

Fixing Perspective Distortion With the Transform Sliders
With seven transform options, you can separately adjust various aspects of the perspective distortion.

In my case, I use the Transform sliders in combination with the Crop Overlay and the Upright Guided tools.
Once I straighten the horizon using the Crop Overlay panel and fix the perspective using the Upright Guided option, I might dive into the Transform section to fine tune the correction.
For example, when you fix a strong vertical distortion, you noticeably change the aspect ratio of the original image and make the objects of the composition much narrower. Here in the Transform section, you can fix it by adjusting the Aspect slider.
To summarize:
How to Straighten a Photo in Lightroom
Step 1
Use the Profile option in the Lens Correction panel to fix the Lens Distortion.
Step 2
Use the Crop Overlay panel to straighten the uneven horizon.
Step 3
Use the Upright options in the Transform panel to fix the vertical and horizontal perspectives.

The whole process should not take any longer than two minutes.