
The preset functionality in Lightroom is the most fundamental feature of the program around which photographers design their digital workflows. In total, Lightroom uses nine different types of presets that address different areas of digital asset management (DAM). The presets can be used in different modules of the program such as the
In one of my previous tutorials, I dug deep and specified how each of the nine types of Lightroom presets fits into the big picture of digital asset management and photo editing.
In today’s tutorial, I will address how to create and use the Import Presets to simplify and speed up the process of importing new photos into Lightroom.
Import Module
My personal opinion is that the Import Module is the most confusing and perhaps even the most unnecessary part of Lightroom.
Let me explain.
When you open Lightroom, you cannot simply navigate to a folder on your computer, select an image, and start editing it as you would in pretty much every other RAW editor. Before you can start editing photos, you must first import them into the Lightroom Catalog. When you select the Import Photos option, you are presented with a confusing interface that features a gazillion different options (or so it seems).
This always causes confusion for photographers who are just starting to learn the program. It is also the main stumbling block for Lightroom adoption.
This is where the Import Presets can play an important role in overcoming the confusion of the Import Module. You invest the time to understand what import options are essential for your particular workflow and then save them as preset(s). From that moment, you can use the import process on autopilot.
Let me show you what import settings I use in my photography, why I use them, and how to save them as an Import Preset.
Creating Lightroom Import Presets
First, activate the Lightroom Import Module by going to the top main menu and selecting
File > Import Photos and Video…
Optionally, you can use the keyboard shortcut Ctrl (Option on Mac) + Shift + I.
Once the Import Module is active, you will find the Source Panel on the left side. This is where you select the location of the photos that you intend to import into Lightroom. You cannot save the source location as a preset because the location can vary from import to import depending on whether you import photos from a memory card, an external hard drive, or a local folder.
File Format and Import Options
The first option you have to specify is how you want Lightroom to handle photos during the import process.

Do you want to bring the images in the original proprietary RAW format, or do you want to convert them to an open source digital negative format (DNG)?
In my case, I do not bother with the conversion and keep all my RAW images in the original format. I do not see too many advantages for the extra step.
See also: How to Organize Lightroom Presets
Next, you must specify if you want to Copy, Move, or Add the images to Lightroom.
The Copy option means that all the selected photos will be copied to the desired destination on your computer with the originals intact on a memory card.
The Move option means that the original photos will be deleted from the memory card during import.
I never use the Move option to ensure that I have a backup of the original files in the event of file corruption during the transfer.
The Add option is used when you already have images on your computer in the right location and you simply want to add them to the catalog.
For example, if you manually copied files from a memory card to a computer, you would simply use the Add option.
Next, we move to the right panel where most of the import options are located.
File Handling
These are the options I use in the File Handling panel in 99% of cases.

For faster performance, I want to make sure that full size (1:1) previews are generated. I also select the “Build Smart Previews” option. If you are not sure what Smart Previews are, take a look at my in-depth article here: Lightroom Smart Previews – When, Why and How to Use Them
I select the “Don’t Import Suspected Duplicates” option to ensure that I do not import the same photo multiple times.
You have the option of Making a Second Copy of the imported photos on another location like an external backup hard drive. I do not use this option because I have an automated backup system that backs up my desktop computer every night.
The “Add to Collection” checkbox makes the imported photos part of the collection of your choice. I do not use this function.
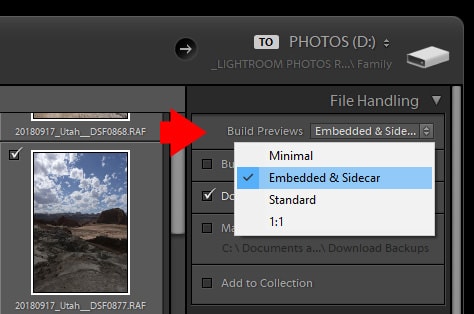
To generate full-size previews and Smart Previews for every imported photo takes a lot of processing power and is time-consuming. When I import 5,000 RAW photos after one of my trips, this could take hours. I developed a routine to always start the import process before I go to bed at night. When I wake up in the morning, the import process is complete, and I am ready to start processing my new photos.
If I am on the road with my laptop and cannot afford to drain the laptop battery to generate full-size previews, I use the minimalistic option—Embedded & Sidecar. In this case, Lightroom uses smaller previews that are generated by the camera and embedded into the RAW files. This allows me to start analyzing and culling my photos in seconds without taxing my laptop battery.
File Renaming
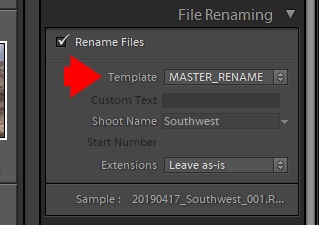
Lightroom gives you the option to rename all the files that you import into the catalog. This is an optional feature. It is absolutely normal to keep the original file names generated by the camera.
I prefer to rename my images by adding the date the photo was taken and the location to the original file name. To make sure my naming convention is consistent, I use the File Renaming Presets.
To learn how to create and use File Renaming Presets, check out my dedicated article here: How to Create and Use Lightroom File Renaming Presets
Apply During Import
Here you can apply the Develop Preset of your choice to all the imported photos. For a long time, I hardly used this functionality. I only recently started to appreciate it thanks to the advances in machine learning.
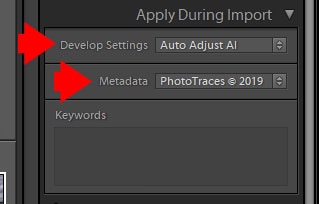
In the Basic Panel of the Develop Module, there is an Auto Button that is powered by AI and machine learning algorithms. When the Auto function is activated, Lightroom analyzes the image and tries to improve it automatically by applying various edits. This feature becomes more effective and useful with every Lightroom update. I created a Develop Preset (Auto Adjust AI) that only does one thing—triggers the Auto function. When I apply this preset to all my imported photos, it gives me a more realistic version to start organizing and culling my newly imported photos in the Library Module.
Next, there is a very useful option to apply a Copyright Preset to all your photos during the import process. I use this option with any photo I bring into Lightroom.
You can learn how to create your own Copyright Presets here: How to Create and Use Lightroom Copyright Presets
You can leave the Keywords section empty. Keyword selection varies for every import so you will enter these manually.
Destination
You specify where you want the new photos to be stored in the Destination Panel.
This is the setup I use for the Destination Panel.
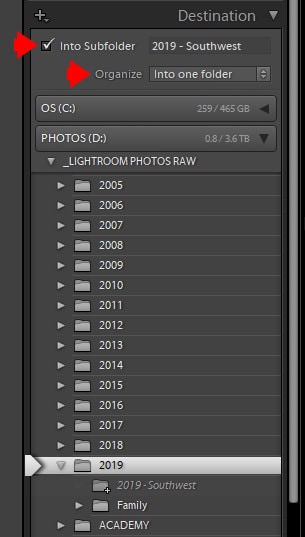
I specify the name of the folder I want to create and store all the imported photos there. Optionally, you can organize the photos By Date. For each date, Lightroom will create a dedicated folder using the date as the folder name.
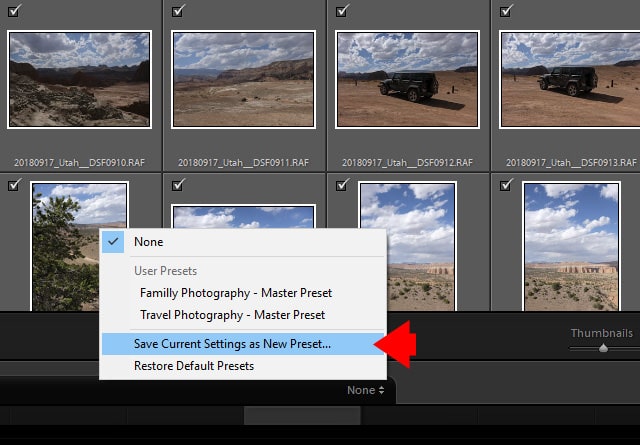
Saving the Import Setting as a Presets
When you are happy with the Import settings, click the black panel at the bottom of the Import Module and the “Save the Current Settings as a New Preset…” option will be available.
Name the new preset and click the Save button.
You are done.
Applying the Import Presets
The next time you import new photos into Lightroom you will not have to go through all the options of the Import Module. You can even minimize the entire Import interface by clicking the Minimize button on the bottom left corner.
From the bottom of the panel, select the Import Preset you created in the previous step. Next, specify the keywords you want to add to the entire import. Then, you are ready to hit the Import button.
